The Crimsonscale Letter
The Crimsonscale Letter
This is a huge quest so we have split it in 3 parts. Follow the links below to move to the relevant section: Arakas Raven's Dust Back to Arakas
Arakas Part I
Go to Lighthaven temple and speak with Kilhiam. She will give you a letter (double click in inventory) that says the following:
Dear Friend
You may find this letter a little odd and I apologize, but the matter is of utmost importance and before you embark on your journey I would like you to fully understand the situation in which you have been forced into. From this day forth, your life will never be the same. I cannot explain everything in this letter, but I strongly recommend that you see who goes by the name of Efnisien. He lives in a small house east of the temple of Lighthaven. Meet with him and he will explain what must be learned.
Crimsonsacle
Head to Efnisien's house located east of Lighthaven Bank and go to the second floor. As soon as you click on him, 3 Assassins will appear. Kill them and click on Efnisien again. Say “Guards”, “Assassins”, “Olin Haad”, “Under siege”, “Something”, “Services”, “Refused”, “Visit”, “Letter” and you will learn about Olin Haad and the heartstone. Efnisien also mentions that you must speak with Olin Haad and if you want Olin Haad to pay attention to you, give his guards a beating or two.
Say “Bye” and head to the Lighthaven Cave and find Olin Haad's castle. Click on the castle's door and you will be teleported inside the castle. Follow the red carpet and you will find Olin Haad. Try to speak with him and if he refuses, go outside the castle and kill about 20 of his guards. Return and talk with him. Say “Seeking”, “Fight” and you will be teleported to a room with 4 Olin Haad Elite Guards. Guards will die from your “body energy” and you will be teleported back to Olin Haad. In this point you will receive the Wrath of the ancients aura. Continue the dialogue with Olin Haad, saying “They”, “Harbinger”, “Prophecy”, “Seeds”, “You”, “New breed”, “Answered” and you will learn about the prophecy, the Harbinger of Death and his seeds. Olin Haad will also mention that you must find Gunthar and warn him that he will not leave Lighthaven in peace, until he gives him what Gunthar has promised him.
Head back to Lighthaven temple and click at the door behind the throne. You will teleported inside the small room. Go down to the dungeon and find High Priest Gunthar Say to him “Demands”, “Stone”, “Merchant”, “Wait”, “Necromancer”, “Corrupters of Gluriurl”, “Battle of Emanations”, “Harvesters of Life”, “Dragons”, “Completely”, “Theodore XIII”, “Heartstone” and you will learn about the cult of Gluriurl, the heartstone and that he sold the heartstone to a merchant. Now say “Yes” to accept helping Gunthar find the heartstone. Say “Looking” and he will tell you to search in Windhowl. You will also receive 1000 gold pieces and 10000 exp points. Continue the dialogue by saying “Nomad” and he will tell you that that's the merchant sign.
Head to Windhowl and search for the Merchant Guild located left from the weapon store. Find Guild Leader Ethan and say “Nomad”, “Misfit”, “Aggressive”, “Bargain”, “Heartstone” and he will tell you more about the merchant. As soon as you mention the heartstone to him he will tell you that he has a problem and he cannot spend his time speaking with you. Say “Problem”, “Duties” and he will tell you about the debts of Urik the tailor. Say “Mercenaries”, “Task” and you will accept helping Ethan to get the money that Urik owes.
Head to Urik's house, located west from the Windhowl tavern. Go upstairs and say to him “Simpleton”, “Discuss”, “Bargain”. He refuses to give you the money he owes. He will call for help and 3 Thieves will appear. Slay them and speak again with Urik. He will give you 1000 gold pieces (the money he owes to the merchant guild).
Head back to the Merchant Guild and talk with Guild Leader Ethan again. Click on him, say “Money” and he will take the money. You will also be rewarded with 40000 experience points. Say “Nomad”, “Lesson”, “Suspect”, “Obsidian conclave”, “Help” and he will tell you that he suspects that Urik and Nomad work together. Say “Keys” and he will give you a set of keys that he obtained from Urik's house. He will mention also, that he believes, one of those keys will open Nomad's house. Say “House” and he will tell you that it's located somewhere in the south part of the town.
Head Southwest and search to find the Nomad's House. It's located beside the Windhowl walls. Click on the door, Nomad's house key will disappear and you will be teleported inside the house. Go upstairs and open all four chests. In one of them you will find a small key. Go to the second floor and open both chests and you will find Owain's letter. Click again on chest and you will find 1000 GP, hidden underneath a fake bottom.
The letter says (double click on inventory):
Dear Nomad
We have finally found the accursed crypt that you have been seeking all those years. Last week I sent a team to retrieve the relic that you have asked, but they never returned. I told Urik about it and he forced me to send another team, which only one of my men returned with his arms gnawed off! I am calling this whole thing off. You may do as you like, but I'm not sending anyone else into this God forsaken place! I'll wait at the druid camp in the northeast part of Arakas for ten days. If for any reason I hear you bring Urik with you or you don't meet me there, I'm gone.
Owain
Head to the Order of Nature (Arakas Druid's Camp) and find Yrian Earthsong located in the house east from Stonehenge. Talk to him and he will ask if you are the traveller sent by the Winds to help them. Say “Yes”, “State”, “Resistance”, “Nomad” and you will learn about the disappearance of the Great Father and the sickness caused by the Nomad. Continue the dialogue saying “Staff”, “Commander” and you will learn that he can cure the sickness if he had his staff. But Nomad, ordered his commander to take the staff. He will also mention that Nomad's force's has camped southeast from the Druid's Camp, near the river.
Head southeast, find and kill Commander Owain and his minions (Olin Haad Soldiers).
Attention: Commander Owen and his guards aren't easy in low levels. Try to find a party to help you or be sure to carry a lot of healing potions.
Once Commander Owain is dead, you will receive Solinae's staff. Head back to Yrian's Earthsong house and click on him. Yrian will take his staff and you will receive 75000 exp points. Say “Nomad” to him and he will mention that the Nomad was looking for a crypt. Say “Crypt” and he will tell you that the way to the temple is near a small settlement somewhat far west from here. You will also receive the Guardian Ring of Vitality and Gem of Vitality.
Head to the Gypsy Settlement located southeast from the bridge to the caves (Cursed Valley). Find Gypsy (a female character) and talk to her. Say “Traveller”, “Seer”, “Nomad” and she will say that she will help you find the Nomad. Before that he will ask you some questions in order to attune himself with your aura. Answer “Yes”, “Yes”, “Giver of Life” and he will say that she has found the Nomad that you are looking for. She is in the ancient temple of a dead god called Gluriurl. The temple is located on an island that was separated from the mainland by a large body of water during the god's downfall. To reach this island, you must travel through a cave that lies north of here.
Head north and find Nomad's Crypt. Enter it and go north. Find the exit, enter and you will end up in a island with dead trees (great graphs). Head east until you find a big house. Enter and head east to find the crypt entrance. Enter the crypt and make your way north to the Altar. You will see an Altar, a portal and two whirlpools. Enter the whirlpool on the right and you will end up at the Tomb of the Fallen. Search the crypt for Fallen Warriors (located at the north part of the crypt). Kill them until they drop the Corrupted heart. Pick it and enter the portal behind them. You will be teleported back to the Nomad's Crypt near the Altar. Now enter the whirlpool on the left and you will end up at the Cave of Corruption. Find the well filled with snakes. Click on it and you will collect the Blood of Gluriurl in a bottle. Then enter the portal near the Altar and you will once again teleport back to the Nomad's Crypt near the Altar.
Touch the Altar and the heart of Gluriurl will began to pulsate, causing the portal to shimmer in answer. Step inside the portal and your vision blurs briefly…
You will end up in the Darkstone Crypt. Go northwest and you will find a ribcage. Click on it and you will receive the Darkstone, 125000 experience points and the following message:
A dark stone floats in the air where the heart should be. With great care, you take the dark stone and replace it with the Heart of Gluriurl. The Gypsy's voice enters your head: [Player name]! You must come see me, I have something important to show you!
Return to Gypsy and click on her. The Gypsy will mention that she feels the presence of a Darkheart on you. Say “Darkheart”, “Dreams”, “Decaying Corpse”, “Plan”, “Sacrificed” and you will learn about the cursed Darkstone, the Gypsy's strange dreams, and your new task. You must bring the Darkstone to the temple of Artherk in Lighthaven. Say “Something” and he will offer you three items to choose from. The items are the following: - Amulet of Renewal and the Gem of Renewal - Amulet of Regeneration and the Gem of Regeneration - Trueshot's Quiver Make your choice, and head to Lighthaven Temple. The door that leads to High Priest Gunthar is locked. You will receive the following message:
The door is locked but there is a note on it. The note reads: [Player Name], I apologize for not being there to meet you, but I had urgent matters to attend to. If you wish to know where to find me, talk to the priests in the temple.
Go speak to Brother Kiran. He will ask you if you came to see the High Priest Gunthar. Answer “Yes” and he will tell you that he called a meeting of his own with the head of their order and that it seems he had some important things to discuss with him. Say “Important things”, “Town hall” and he will tell you to search for him at the big building at the end of the street southeast of here. He will also mention that if you're not sure, look for Kirlor Dhul.
Head to the Lighthaven bank and speak with Kirlor Dhul. Click on him and he will mention that there was some commotion on the street just outside earlier. He will also mention that maybe someone saw what happened.
Exit the bank and search for lady called Amelia. Click on her and she will beg you not to kill her cause she didn't see anything. Say “Kill”, “Them” and she will say that six men attacked the high Priest Gunthar. Say “Brigands”, “Where” and she will say that they headed southwest of the west bridge, out of town.
Go to the Lighthaven west bridge and head west until you find a path. Follow the path to the south and you will end up at the Brigand's Camp. Slay the Brigands and finally slay Gorlok Bloodaxe. Once you kill him, High Priest Gunthar will be free (he will appear beside you). Click on him and he will thank you. He will also ask you if you have retrieved the stone. Answer “Yes” and he will tell you that you must hurry and bring the stone to Olin Haad. You will be also rewarded with 200000 exp points.
Head to Olin Haad's Castle. Click on him and say “Nomad”, “Darkstone”, “Heartstone”, “Lies”. You will learn about the heartstone and you will be teleported to the Castle Library with 3 Olin Haad Private Guards. Kill them and talk again to Olin Haad. He will send you to High Priest Gunthar at Lighthaven temple.
Head to High Priest Gunthar and say “Look”, “Kept”, “Gods”, “Service”, “Physical Body”, “Sacrificing”, “Bind”, “Seal”, “Intentions” and you will learn more about the heartstone. He will also tell you that you must meet a strange fellow who is known as the Nameless Bard. He will also say that you must first speak to Tarnian located west of Lighthaven square.
Find Tarnian (west from Lighthaven square) and speak to him. He will ask if Gunthar sent you to him. Answer “Yes” then say “Darkstone”, “Worth”, “Gluriurl”, “Skull”, “One”, “Son”, “Murders”, “Fanatic”, “Believes” and he will give you a Runed Stone Tablet. Say “Raven's Dust” and he will give you directions to find Antonian the hermit. He will teach you how to use the Runed Stone Tablet. In order to find Antonian the hermit, take the northwest bridge out of town and get on the road to Windhowl. At the first intersection, go southwest. Shortly after, you will cross a bridge. After the bridge, the road will turn north. Once you get to the intersection where it branches off northeast and south, just keep going northwest and pass between some mountains to find his cottage.
Follow the directions and you will find Antonian the Hermit (resides west of Arakas crypt). Click on him and he will ask you if you got the Runed Stone Tablet from Tarnian Wolfmane. Answer “Yes”, then “Runed Stone Tablet” and you will learn that it's a teleport device. Say “Blink”, “Prayers”, “Ancient”, “Nexus index” and you will learn that in order to use the Runed Stone Tablet you will need some nexus indexes. Say “Location”, “Directions” and he will mention that you can use the Runed Stone Tablet at any time to visit him (clicking on Runed Stone Tablet teleports you just west from Hermit Antonian). He will also become so engrossed in his search that he will completely forget about your presence. Click on him again and say, “Yes”. Antonian will give you the following directions:
Travel north and search the river until you find a bridge across, onto a small island. There is a nexus index on that island.
Follow the directions and find the nexus index (it's located at the small island between the two bridges (over goblin camp)). Click on nexus index and you will get the following message:
You place the Runed Stone Tablet on the Nexus Index. The nexus index emits a beam of light that strikes the tablet. You take back the Runed Stone Tablet.
Now use the Runed Stone Tablet again to return to Hermit Antonian. Click on him, say “Yes” and he will give you the following directions for the 2nd nexus index:
Take the road south and head southwest at the first fork. Shortly after the road turns west, you will come to another fork. Go north and then northwest across the bridge after that. As soon as you cross the bridge, head straight north and you will come upon another nexus index.
Follow the directions and find the 2nd nexus index (located north after you cross the kraanian bridge). Click on it and you will get the previous message again.
Use the Runed Stone Tablet again and return to Hermit Antonian. Click on him, say “Yes” and he will give you the following directions for the 3rd nexus index:
Take the road south and head southwest at the first fork. Shortly after the road turns west, you will come to another fork. Take the southwest road until you cross a bridge, then head straight south into the valley to find another nexus index.
Follow the directions and find the 3rd nexus index (located north of thieves town mountain). Click on it and you will get the known message.
Once again, use the Runed Stone Tablet and return to Hermit Antonian. Click on him, say “Yes” and he will give you the following directions for the 4th nexus index:
Take the road south and head southwest at the first fork. Shortly after the road turns west, you will come to another fork. Go north and then northwest across the bridge after that. As soon as you cross the bridge, follow the river west until its end where it meets the ocean. You should find a nexus index beside the shore there.
Follow the directions and find the 4th nexus index (located: go west from the kraanian bridge until you reach the ocean. Then go a little south). Click on it and you will get the usual message.
Again use the Runed Stone Tablet to return to Hermit Antonian. Click on him, say “Yes” and he will give you the following directions for the 5th nexus index:
I don't have any specific directions for this nexus index, but I will tell you that it is located on the southernmost point on this island. With that, you should be able to find it on your own.
Follow the directions and find the 5th nexus index (located south of Brigands cave, beside the ocean). Click on it and you will get the message again.
For the last time, use the Runed Stone Tablet and return to Hermit Antonian. He will tell you that you have found all of the nexus indexes that he knows of. Note, that you must be at least level 25 to use the Runed Stone Tablet to go to Raven's Dust.
Note: In 1.25a version there is a bug and you cannot read Crimsonscale letter and Owain Letter (actually clicking on Owain's letter opens Crimsonscale letter). Ignore them and continue the quest. If you want just to view them, go to your t4c directory and open the folder “help”. Use an image viewer and click on letter1.pcx and letter2.pcx. Note #2: You can also click the five nexus indexes one after the other without returning to Antonian. You must speak to him before clicking the first nexus and after the click on the fifth.
NPCs involved: Kilhiam, Efnisien, Olin Haad, High Priest Gunthar, Guild Leader Ethan, Urik the Tailor, Yrian Earthsong, Gypsy, Brother Kiran, Kirlor Dhul, Amelia, Tarnian, Hermit Antonian Mini-Bosses involved: Assassin, Olin Haad Elite Guard, Thieve, Commander Owain, Gorlok Bloodaxe, Olin Haad Private Guard Quest Reward Synopsis: Wrath of the Ancients aura, Guardian Ring of Vitality (0 reqs) and Gem of Vitality, Amulet of Renewal and the Gem of Renewal (0 reqs) or Amulet of Regeneration and the Gem of Regeneration (0 reqs) or Trueshot's Quiver (110 Agi, 20 Str), Runed Stone Tablet, 2000 gold pieces, 450000 exp points
Raven's Dust
After you complete the good or the evil path to Raven Dust, go back to Hermit Antonian and click on him. He will ask you if you want more directions to the nexus indexes. Answer “Yes” and he will say that you have found all Arakas stones. He will also say, that you must find Aquinos, a friend of his located in the town of Silversky. You will also be rewarded with 250000 exp points. Continue the dialogue, saying “Scholar”, “One” and he will mention the Nameless Bard.
Use the Runed Stone Tablet (or travel any other way you want) and head for Silversky. Note: Runed Stone Tablet will teleport you near Greyleaf (that's east from taras pond). Go to Silversky temple and talk to Scholar Aquinos. Say “Visit”, “Location”, “Where” and he will tell you where the Nameless Bard resides. The directions are: Nameless Bard lives deep inside a cave far to the west. Take the road out of town heading northwest, then at the second fork, the one where the road continues on north and branches off to the northwest, take the northwest route. Follow that road until it ends, then keep going west until you reach the mountain range. The entrance to the cave can be found in that vicinity.
Follow the road to Grott and at the first crossroad after you pass Grott's spawn location, head west. Pass the spawn location of Eye Patched Quardros and continue west. You will end up in a mountain range. There you will find the cave entrance. Find the Nameless Bard (he has the skin of an Attrocity) and speak to him. Say “Punisssh”, “Abysssss”, “Remnantsssss” and he will say: In a tree you will find wisdom, in a fountain, knowledge. Where wisdom and knowledge converge, the answers you seek will emerge.
Go down the southeast passage below the bard and find the tree. Click on the tree and get the Branch of Wisdom. Then go up the northwest passage and find a fountain. Click on the fountain and you will use the branch of Knowledge to stir the Waters of Knowledge. The waters swirl before your very eyes to form a single word: ETHEREAL. You will be rewarded with 300000 exp points. Return back to Nameless Bard and talk to him. He will say that what you have found is the word of power that opens the great gates of tremendous evil. They rest near the northernmost place in this land. To reach it, you will need to travel through darkness. Rest assured that if the Waters of Knowledge did not provide all the answers you seek, the one who dwells past those gates surely shall. He will also mention that this is your curse. Say “Curse” and he will say that he was chosen and cursed too and that one day we will be avenged.
Head to the Broken One cave, also known as the Skeleton cave. Enter the cave, head west and follow the cave wall until your reach an exit (it's the old exit to Forest of No Return). Exit and head northwest into the cemetery, until you meet an NPC called “A gate keeper”. Click on him and he will say that the mausoleum beyond leads to the sanctuary of the ancient God of Corruption, Gluriurl. He will also say that only those who speak the word of power are allowed to pass. Say “Word of Power”, “Ethereal” and he will warn you that the mausoleum is a dangerous place. Say “Yes” and you will enter the mausoleum.
Inside the Mausoleum you must kill the 4 Vicars and get their crystal keys. Head northeast until you reach a big room. Then head southeast and kill Vicar Kervian. Get the purple crystal key and head northwest. At the first big room continue northwest until you reach another big room. Then head northeast and go as northeast as you can. At the end of the road follow the path to northwest. Find Vicar Ramiel and kill him. You will receive the green crystal key. Head northwest and follow the path that turns southwest. Head southwest and count the roads you will meet turning southeast. Follow the 4th road going southeast you come across. There you will find Vicar Vharnes. Kill him and you will receive the blue crystal key. Head back northwest and turn northeast. At the first crossroad head northwest and then head southeast. Continue southeast until you meet a road going northwest. Head northwest and you will find a portal. Go northeast from the portal and you will find Vicar Ashgoth. Kill him and you will receive a red crystal key. Then head back to the portal and then step inside it. Follow the red carpet and you will meet Crimsonscale, the great Dragon. Talk to him, say “Letter”, “Beginning”, “Chosen”, “Justice died”, “Justice”, “Winds”, “Battle of emanations”, “Olin Haad”, “Fascinated”, “Changed sides”, “Council of the Eight” and you will learn about Olin Haad 's evil plans and about the Council of Eight. CrimsonScale will also ask for your help. Answer, “Help” then say “Prevent”, “Great Library” and he will give you the location of the Great Library. Say “Something” and he will give you an Armlet of Flames and a Gem of Flames and a Vial of Dragon Blood.
Head to the Great Library (located east from Raven Dust crypt entrance), go to the 3rd floor and Speak with the Custodian. Say “Barbarians”, “Uneducated”, “Rite of Passage” and he will give you a riddle to solve in order to prove to him that you are not uneducated. The riddle goes:
“Dos” “vaneslae” “navidal”, “Kadrim” “lok” “ungrim” “dok”, “Somalina” “oundi” “inesora”, “Tharrgra” “nethdrovar”. If you can tell me what it means, then not only will I grant you access to the top floor, but I might actually be nice about it. Oh, and here's a hint. You don't stand a chance at solving this little puzzle if you don't visit the library's basement.
Go to Library's basement were the 4 Scholars resides. Speak to them.
To the Scholar that mentions the “language of the Elves” (located at the NW room) say, “Dos vaneslae navidal”. He will answer “To look upon one's self”.
To the Scholar that mentions the “language of the Dwarves” (located at the SW room) say, “Kadrim lok ungrim dok”. He will answer “One must only have eyes”.
To the Scholar that mentions the “language of Faeries”, (located at the NE room) say, “Somalina Oundi Inesora”. He will answer “To recognize one's own ignorance”.
To the Scholar that mentions the “language of Dragons” (located at the SE room) say, “Tharrgra nethdrovar”. He will answer “One must open these eyes”.
Go back to the 3rd floor and speak with Custodian again. Say “Yes”, “To look upon one's self”, “One must only have eyes”, “To recognize one's own ignorance”, “One must open these eyes” and you will gain full access to the library. Say “Access”, “Yes” and you will be teleported to the 4th floor.
Speak with one of the Librarians. Say “Yes”, “Exchange for the essence”, “Physical body”, “Ogrimar”, “Lothar the just”, “Abandoned”, “Elvenweave”, “Heart” and you will realize that Olin Haad is planning to bring Gluriurl back to life. You will be also rewarded with 500000 exp points.
Speak to the other two librarians and hear their stories. The one will talk to you about the Darkstone and the other one about the Harbringer. Then head to Olin Haad's castle.
Talk to Olin Haad, say “Dare” and you will be teleported in a small room with Olin Haad. He will attack you. You can't kill him so let him defeat you. Just before the final blow you will be teleported back to his castle. Say “Invincible”, “Herald”, “Destroy”, “Soothing voice”, “Remains” and you will learn all about the resurrection of Gluriurl.
Head to High Priest Gunthar and talk to him. Say “Blessing of Artherk”, “Souls”, “Stop”, “Part”, “Harvester”, “Illusion”, “Recently”, “Wrong”, “Heart of Artherk”, “Efnisien” and you will learn about the Caledbolg and that it is kept safe in a shrine in the southeast part of the desert on Raven's Dust. He also tells you to go find Efnisien.
Go to Efnisien and say to him “Service”, “Entrance” and he will tell you that the entrance is through the stairs in the room behind the locked door. But Olin Haad has found an alternate way to enter and he's inside the temple right now. It will serve you no good to enter now, as you won't be able to defeat him without a special weapon of some sort.
You need to find Caledbolg. Go to Raven's Dust desert and go south until you reach a new range of mountains. Search for a crypt entrance. In front of the crypt entrance is a gate keeper called Ramirgo. Talk to him, say “Guardian”, “Enter” and he will teleport you inside. Follow the dungeon wall and kill Terror Demon, Chaos Demon and Darkness Demon. Then head to the middle of the dungeon and you will find 3 portals. Enter one of them and you will end up at a small room. Click on Lothar and you will receive the Caledbolg.
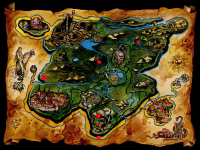
Note: There are no directions for the nexus indexes (at least we haven't found any NPC to respond at keywords “Nexus index” or “Runed Stone Tablet). Look at the map and travel to all of them. Once you have placed the runed stone tablet in all nexus indexes return to Hermit Antonian to activate your runed stone tablet.
NPCs involved: Hermit Antonian, Nameless Bard, A gate keeper, Crimsonscale, Custodian, The 4 Scholars, The 3 Librarians, Olin Haad, High Priest Gunthar, Efnisien, Ramirgo, Lothar Mini-Bosses involved: Vicar Asgoth, Vicar Kervian, Vicar Vharmes, Vicar Ramiel, Terror Demon, Chaos Demon, Darkness Demon Quest Reward Synopsis: Armlet of Flames (reqs 0) and Gem of Flames, Vial of Dragon Blood, 1050000 exp points
Back to Arakas part II
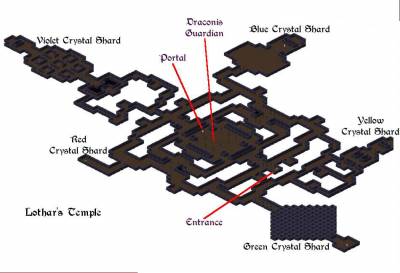
Now that you have Caledbolg head back to Efnisien. Click on him and he will unlock the door. Go downstairs and head into Lothar's Sacred Temple.
Head north, to the centre of the temple and you will see a wounded Draconis called Draconis Guardian. He is still alive so speak with him. He will ask if you have been sent by Efnisien. Answer “Yes”, “Draconis”, “Prophecy”, “Stop”, “Burial chamber” and you will learn more about the prophecy. He will also tell you that you must enter the portal just behind him in order to stop Olin Haad.
The portal has 5 small holes. In order to activate the portal you must find 5 small shards, a red, a yellow, a blue, a green and a violet shard. Check the map where the 5 shards reside.
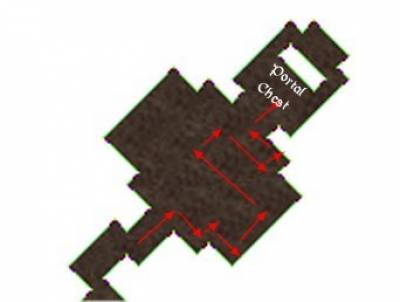
For the blue shard you will enter an invisible maze. Find your way through the maze, open the chest and grab the blue shard. Go through the portal and you will end up just before the maze room.
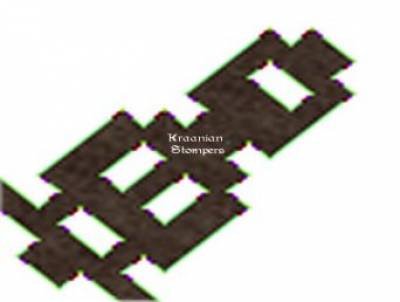
For the yellow shard you must kill Kraanian Stompers until they drop the shard. Once they drop it, pick it up.
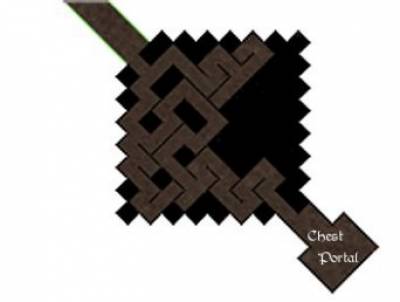
For the green shard you must find your way though a huge maze. You will end up at a chest. Open it (twice) and pick up the green shard. Go through the portal and you will end up at the entrance of the room.
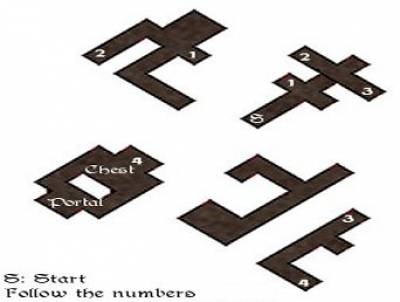
For the red shard follow the corridor and enter the floor portal. You will end up at a small portal maze. Find your way to a chest and take the red shard. Enter the portal and you will end up beside the first floor portal.
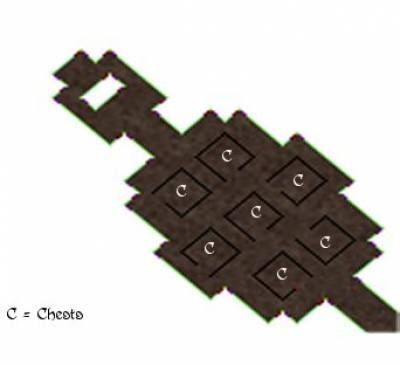
For the violet shard you will have to search 7 different chests. The shard is placed randomly for each player. Find it and head back to the center of the temple.
Enter the portal beside Draconis Guardian and you will end up at the Burial Chamber. Go southeast and you will meet with Olin Haad. Equip Caledbolg and attack him. He will mention that the ritual is completed. As soon as you kill him Gluriurl, God of Corruption will appear.
A message in blue letters will appear to all players online: “The sky darkness suddenly…”
Attack Gluriurl and kill him (don't forget to remove the Caledbolg). When he is finally defeated another message will appear:
The Gypsy's voice enters your head: You have defeated the God of Corruption! Please, come visit me when you have the chance, as I must thank you personally for all you have done.
Blue letters again : “The ground shakes violently for a few seconds” Now head back to Gypsy for a reward. Say “Fourth coming”, “Respectful guardians” and you will be rewarded with an Amulet of Rejuvenation, a Gem of Rejuvenation, an Amulet of Replenishment, a Gem of Replenishment and a Quiver of Stability.
Note: After killing Gluriurl if you talk to Efnisien he will take the Darkstone from you.
NPCs involved: Efnisien, Draconis Guardian, Gypsy Mini-Bosses involved: Olin Haad, Gluriurl Quest Reward Synopsis: Amulet of an Rejuvenation and Gem of Rejuvenation (0 reqs), Amulet of Replenishment and Gem of Replenishment (0 reqs), Quiver of Stability (220 Agi, 30 Str)

